30.9.11

Dinosaur Pop Up Card Tutorial

Dinosaur Card
My 5 year old daughter loves dinosaurs and we made this simple dinosaur card from foam and felt.Here is the inside of the dinosaur card with a Pop up Trex.
Dinosaur Pop Up card 
I cut the foam Brachiosaurus outline free hand from foam. Dinosaurs are easy to draw as there is no limit to your imagination!We cut out some yellow felt shapes to use as the dinosaur spots.

Dinosaur Card
Here is my daughter sticking the yellow felt spots using fabric glue.It takes so much longer to stick felt if you use normal white glue.Little one had fun planning the positioning of the spots!
Dinosaur Card
The grass is again free hand cut from a strip of green felt. Here you can see my little helper sticking the felt grass. I couldn't allow her imagination to run free for this card as I had to follow a sketch for the ICRC 10 challenge!
Dinosaur Card
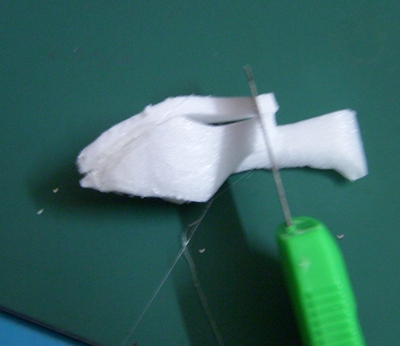
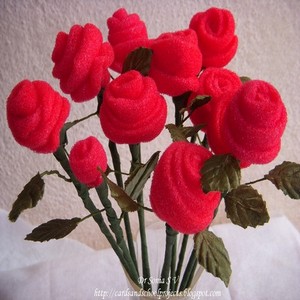
We stuck the scrap bits of green felt as grass blades below the continuous felt strip. The pink roses are spiral paper roses. 
Dinosaur Pop Up card Tutorial
When you craft with a 5 year old little girl-- everything ends up pink and girly so here is our pretty purple- pink girly dinosaur wearing a flower on her head and lipstick on her lips!!
Dinosaur Pop Up card Tutorial
The silver butterfly is our touch of recycling- punched out from a takeaway aluminium foil box![Yes my recycling spree has not ended!]
Dinosaur Pop Up card Tutorial
Here is the Aluminium take away box from which I punched out the lovely butterfly.This Aluminium Butterfly is so much more sturdier than a paper butterfly and its wings stay up so easily.And don't worry my punch is fine![ In fact I read somewhere that if your punch becomes blunt you can sharpen it by punching through foil]
Punched Recycled Butterfly
How to make the Pop up Card
My regular readers know how much I love pop up cards- well I try to add a fun element to most of my cards and I am especially pleased with the way I made this one as it involves a bit of recycling again 
The scenic background of the dinosaur pop up is not a patterned paper or something I printed but one side of an advertisement for a medicine! 
  • Chose a picture larger than one side of your folded card as its easier if it crosses over the mid line[ If not you can still use some other tricks to make it pop!- See my older tutorials to make pop up cards  : Recycled Pop Up card tutorial and Make any picture into a pop up card Tutorial]
  • Score the card in 2 places [ You can create multiple scores and folds -here I am illustrating one of the simplest pop up card making techniques!]
Dinosaur Pop Up card Tutorial
Fold your card valley, mountain and valley as shown here.Experiment before you make your final folds.

Dinosaur Pop Up card Tutorial
Stick the broad part of the picture on one side of the base card.Then  fold it and apply glue on the small part.Fold over the base card so that your pop up will find its own place.Allow enough time for the glue to dry and  your pop up scene is ready!
Dinosaur Pop Up card Tutorial
We stuck a Trex [ from sparkle box] on the popping out ledge.
Dinosaur Pop Up card 
When recycling pictures in card making your picture is often not the ideal size-- our picture covered only part of one side of the base card - so I cut more greenery from a calendar and from some moonstone paper and did a paper collage scene!
Dinosaur Card and Homemade Dinosaur Toys
The picture shows our pop up dinosaur card and 2 home made dinosaur toys- shall share more about them in the next post! 
I hope you enjoyed this simple pop up card.Do leave me your comments-- that is what keeps the energy flowing!
Edited this card won at ArtsyCrafty

25.9.11

Paper Organizer Ideas

Paper Organizer
Though I have been blogging for more than a year and am a paper crafter  till recently I didnt own many papers or card stock . Of late my paper and card stock has slowly started increasing as I discovered places to buy them from!
I was also gifted some awesome paper by Asha,Priya,Jaya and Angelin [ all blogger pals!] I treasure these more than anything and had to make a lovely storage shelf for them!

This is what I recycled to make my Paper Organizer shelf [ the package of my daughters playhouse]
Paper Organizer Tutorial
I cut it up and made it into equal sized boxes
Paper Organizer Tutorial
Stacked and stuck the boxes together and made a door from another cardboard box
Paper Organizer Tutorial
Wrapped a gift wrap  paper [ recycled- it was the wrapping of my birthday gift!] and embellished it
Paper Organizer
On the door of the paper organizer shelf I added a 3 D decoupage honeybee [ I made 3 of these to use in this project].I made the pink knob for the shelf door from a broken hair accessory!
Paper Organizer
The top of the shelf has the 3 D decoupage bee which I made slightly differently [ difficult to see here !].
Paper Organizer
Here is the closeup of the 3 D decoupage Honey bee.
3 D decoupage Honey bee
Also added a punch craft dove made using a scallop punch and a pear punch [ Click here for punch craft dove tutorial]
Paper Organizer
The pink oval frame is a foam frame
Paper Organizer
Since my first paper storage idea for the smaller papers was fun to make, I ventured to make a paper organizer for my A4 card stock too. Made it in pink and blue to match my earlier paper shelf.
Paper Organizer
For the A 4 sized paper Organizer, I recycled this old box and made it into a double partitioned Paper organizer.
Paper Organizer Tutorial
Cut the sides in a slanting fashion. This is inspired from my dear blogger friend Ujjwal who does some lovely recycling too. Thank You Ujjwal for this wonderful and useful idea.
Paper Organizer Tutorial
I added a partition  to hold paper scraps. The partition was glued on using a glue gun.
Paper Organizer Tutorial
I used blue and pink chart paper to line the cardboard paper organizer.Here is the side view showing the slanting cuts which helps to see as well as take out your papers easily
Paper Organizer
Embellished the A4 paper organizer with 3 D decoupage , butterflies, ribbons and pearls.
Paper Organizer
I layered 2 punched butterflies on each other to make this cute butterfly.
Punched Butterfly
The pink roses are handmade punch craft roses whose tutorial I have been promising for quite some time! Sorry- coming soon!
Punchcraft Handmade Rose
The white fence is -- can you guess?? Well its the packaging of apples and pears !

3 D Decoupage
Here is my collection of A 4 size corrugated paper in my new Paper organizer.Daughter helped me to arrange the papers by color!
Paper Organizer
Here are the 2 paper organizers in matching colors
Paper Organizers
I hope my post is in someway useful. Do leave me your comments
Linking to MIM

24.9.11

Thermocol Flowers Tutorial


Thermocol Flowers
I am quite recycle crazy at times and try to make things from some crazy materials! I can never bring myself to throw away the dainty thermocol trays and bowls which are so popular packaging materials in our modern world and when the "junk" heap becomes too big I am forced to think up ways to " make them useful"!
Thermocol is a fantastic medium to craft with.If you like to carve you are going to love this!
What you need for thermocol craft
Thermocol Flowers Tutorial
Craft Knife- Use a  a sharp blade and a blade length longer than you would use to cut paper as thermocol is thicker and its much easier if you work with a longer blade.
Adhesive- white glue, glue dots or a glue gun.
Thermocol trays or bowls or plates.We used a variety of thermocol objects in our hoard [ both myself and daughter are big hoarders of all sorts of crazy stuff !] If you have egg cartons made out of thermocol then you can make the most fascinating flowers and objects!
How to make thermocol Flowers
  1. Cut petals of whatever shape and size that you fancy 
  2. Glue them with your glue gun or adhesive of choice.
The first time my daughter and I tried this craft I almost gave up as the petals just wouldn't stick with white glue! Imagine my surprise when where I had failed my 5 year old had succeeded! She just made an additional base to stick the petals !
I recently bought a glue gun from the local market [Yes its available in India!] and using the glue gun making these flowers is a breeze!
If you are using white glue you need to be really patient .
We made a variety of 3 petal, 4 petal and 5 petal simple flowers.
Thermocol Flowers Tutorial
If you are using a glue gun ,just add some glue to the tips and stick the petals together
Thermocol Flowers
How to make Thermocol Roses
I thought making a thermocol rose was going to be tough but I was pleasantly surprised that I could whip up a lovely  7 cm sized thermocol rose in under 15 mins![With a glue gun of course]
  • Cut petals from the sloping part of the tray or bowl and with the tapering part of the petal positioned on the flat part of the bowl or tray - this will give you a petal that stands up so naturally!
    Thermocol Flowers Tutorial
  • Carve out your large petals from the corners of your thermocol tray. If you are working with a bowl then its even better!The corners give such  natural  shaped petals. 
    Thermocol Flowers Tutorial
    You don't need to mark on the thermocol to help you cut as you don't have to be accurate and it looks more natural if your petals are of different shapes and sizes.  
    Thermocol Flowers Tutorial
  • Cut petals of slightly smaller size for the inner layer of the thermocol rose.
  • Make the central bud of your thermocol rose :Cut diamond tipped petals centered on the junction of the sloping and flat part- this will give you a lovely curved shape. 
    Thermocol Flowers Tutorial
    You need 3 or 4 of these petals to make your bud.
    Thermocol Flowers Tutorial
    Stick the edges together to make your rosebud 
    Thermocol Flowers Tutorial
    Cut off the excess length
    Thermocol Flowers Tutorial
  • Apply glue to the upper surface of the tip of your inner petals and stick them around your central rose bud. 
  • You can fit in around 3 petals around your rose bud depending on your petal size
Thermocol Flowers Tutorial
  • Keep gluing outer petals to get  a rose of your desired shape and size.
    Thermocol Flowers Tutorial
    Here is the closeup of another Thermocol Rose- The fun is no two roses look alike!
    Thermocol Flowers
    We made a bouquet of thermocol roses. I first tried wire stems then felt it was too flimsy and added a skewer stick [ again recycled!]. You can make your own leaves or use store bought fabric leaves which you can wind around the stem as shown here
I stuck the wire into the base of the rose and secured it with glue.
The wooden skewers just add some weight and strength to your rose blooms
Thermocol Flowers
Wrap some green floral tape or ribbon around your stem and you have  beautiful rose stems.
We arranged our thermocol roses in a clay pot my daughter had made in summer camp
Thermocol Flowers
Lots of other ideas for thermocol -  make frames, wall hangings, flower vases,swans, butterflies! Here is a link to some of the projects in which I have used thermocol: Thermocol Crafts.
Have fun and do let me know how you like this recycling craft.
Edited:This recycling project won at Crafty JCChallenge
This tutorial was featured at Craft Gossip
I have made flowers from some crazy materials .Here are links to some "non paper" handmade flower tutorials.

Handmade Foam Flower Tutorials


Foam Rose tutorial

Foam cala lily tutorial

Foam Rose tutorial

Handmade Rose tutorial -Clay/playdough,Aluminium foil,Marzipan,Mseal


Playdough Rose tutorial

Easy Ribbon Rose

Edible rose tutorial

Mseal Rose tutorial

Handmade Flower tutorials - Crystal flowers,Easy Beaded flowers, Sponge roses


Crystal Flower tutorial

Beaded flower tutorial

Spoon flower tutorial

Sponge flower tutorial
Related Posts Plugin for WordPress, Blogger...